Creamy & Quick: 30-Minute Chickpea Curry (Vegan Recipe)


Creamy Chickpea Curry

If you’ve ever found yourself staring into the pantry after a long day, craving a meal that is simultaneously comforting, nourishing, and quick to make, your solution has arrived. This incredibly creamy chickpea curry is more than just a recipe; it’s your new weeknight superhero. It masterfully combines rich, plant-based protein with a symphony of gentle spices and silky coconut milk, creating a deeply satisfying dish that feels both indulgent and wholesome.

The best part? You are in complete control of the flavors, crafting a from-scratch curry that rivals your favorite takeout. Using simple, accessible ingredients, this recipe proves that you don’t need to spend hours in the kitchen to enjoy a homemade, restaurant-quality meal. It’s the perfect answer for busy evenings when you want something genuinely delicious without the fuss.

The Heart of the Dish: Why You’ll Love This Curry

Before we dive into the method, let’s talk about what makes this chickpea curry so special. Chickpeas, the star of the show, are a fantastic source of protein and fiber, making this dish both hearty and healthy. Simmered in a luxurious sauce of coconut milk, tomatoes, and aromatic spices, they transform into little morsels of flavor.

This recipe is built for real life. It’s:
* **Pantry-Friendly:** Built from staples you likely already have on hand.
* **Incredibly Flexible:** Easily adaptable with whatever vegetables you have in the fridge.
* **Meal-Prep Perfect:** The flavors deepen and improve overnight, making leftovers a coveted treat.
* **Naturally Vegan and Gluten-Free:** A crowd-pleasing option for almost any dietary need.

Gathering Your Ingredients (Serves 4)

This simple list is your ticket to a fantastic meal. For the best flavor, use full-fat coconut milk—it provides an unmatched creaminess that is essential to the dish.

* **2 cans (15 oz each) chickpeas,** drained and rinsed (about 500 g total)
* **1 large onion,** finely chopped
* **2-3 garlic cloves,** minced
* **2 fresh tomatoes,** finely diced (or 1 small 14 oz can of diced tomatoes)
* **1 cup (200 ml) coconut milk** (full-fat for maximum creaminess)
* **2 tbsp olive oil** or coconut oil
* **1 tbsp curry paste** (red or yellow) or 1 tbsp of your favorite curry powder
* **1 tsp ground turmeric**
* **1 tsp ground cumin**
* **Salt and freshly ground black pepper,** to taste
* **Fresh cilantro,** chopped, for garnish
* **For serving:** Steamed basmati rice, jasmine rice, or warm naan bread

Crafting Your Curry: A Step-by-Step Guide

The process of building this curry is simple, but each step is crucial for developing layers of deep, complex flavor.

Step 1: Build the Aromatic Base

Place a large skillet or Dutch oven over medium heat and add the olive oil. Once the oil shimmers, add the chopped onion. Cook for 5-7 minutes, stirring occasionally, allowing the onion to become soft and translucent. Avoid rushing this step; the gentle caramelization here builds a sweet, foundational flavor. Add the minced garlic and cook for another minute until fragrant.

Step 2: Toast the Spices

This is the secret to a truly great curry. Push the onions to one side and add the curry paste, turmeric, and cumin to the center of the pan. Let the spices toast for 30-60 seconds, stirring constantly. You’ll know it’s ready when the room fills with a warm, fragrant aroma. Toasting unlocks the essential oils in the spices, transforming them from dull and dusty to vibrant and potent.

Step 3: Create the Luxurious Sauce

Add the diced tomatoes to the pan, stirring to combine them with the spiced onion mixture. Cook for 3-4 minutes, allowing the tomatoes to break down and form a thick paste. This adds a touch of bright acidity to balance the rich coconut milk. Now, pour in the coconut milk, stirring continuously to scrape up any browned bits from the bottom of the pan. Bring the sauce to a gentle simmer.

Step 4: Simmer to Perfection

Add the drained chickpeas to the luxurious coconut sauce, stirring to ensure they are fully coated. Season generously with salt and pepper. Reduce the heat to low and let the curry simmer gently, uncovered, for 12-15 minutes. This allows the chickpeas to heat through and absorb the incredible flavors of the sauce. The sauce will also thicken slightly during this time. Do a final taste test and adjust seasoning if needed.

Step 5: The Grand Finale

Remove the curry from the heat. For a final touch of freshness, stir in a handful of chopped cilantro, reserving a little for garnish. Serve your masterpiece immediately over a bed of fluffy basmati rice or with warm, pillowy naan bread for dipping.

Variations & Pro Tips for the Perfect Curry

✨ The Ultimate Shortcut:

Using canned chickpeas and a quality pre-made curry paste (like Thai red or yellow) is the fastest route to flavor town. There’s no shame in this game!

Lighter Cream Option: 

If you prefer a tangier, lighter curry, you can replace the coconut milk with an equal amount of plain Greek yogurt or a unsweetened oat cream. Stir it in at the very end, off the heat, to prevent curdling.

Boost the Veggies:

This curry is a fantastic vehicle for vegetables. Stir in a few handfuls of fresh spinach during the last 2 minutes of cooking, or add diced zucchini, bell peppers, or roasted carrots with the chickpeas.

Make-Ahead Magic:

This is an ideal make-ahead meal. Prepare it fully and store it in an airtight container in the refrigerator for up to 3 days. The flavors will meld and intensify, making it even more delicious.

Why This Recipe Truly Shines

This creamy chickpea curry is the epitome of what a great home-cooked meal should be: uncomplicated, affordable, and deeply satisfying. It’s a hearty, nourishing dish that never feels heavy, proving that plant-based eating can be every bit as luxurious as any other cuisine. It’s built from humble pantry staples yet is flexible enough to feel new and exciting every time you make it. So, the next time hunger strikes and time is short, remember this recipe—your ticket to a creamy, dreamy, and incredibly fast culinary escape.

Home page

Mushroom Risotto

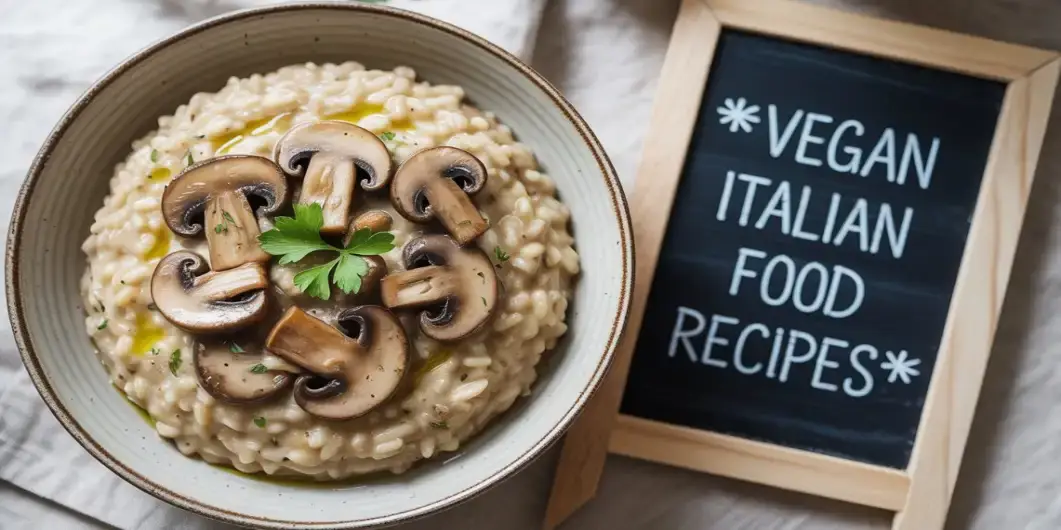
The Ultimate Guide to Vegan Italian Recipes: A Mushroom Risotto That
Will Blow Your Mind

Why This Recipe Proves Vegan Italian Food Recipes Can Be Incredibly
Satisfying

Imagine discovering that some of the most beloved vegan Italian
recipes can deliver the same rich, creamy satisfaction as their traditional
counterparts. This dairy-free mushroom risotto represents the perfect
fusion of authentic Italian techniques with plant-based innovation, proving
that vegan Italian food recipesnever compromise on flavor.

The Magic Plant-Based Ingredients (Serves 4)

For the fragrant broth:
– 1.5 liters of water
– 2 vegetable bouillon cubes
– 1 fresh thyme sprig
– 2 bay leaves
For the sublime vegan risotto:
– 400g Arborio rice (the absolute star)
– Half a kilogram of assorted mushroom varieties (including shiitakes, oyster
mushrooms, and white button mushrooms)
– 1 medium white onion
– 3 garlic cloves
– 150ml dry white wine
– 60g nutritional yeast (the vegan parmesan substitute)
– 3 tablespoons extra virgin olive oil
– 3 tablespoons vegan butter
– 2 tablespoons cashew cream (optional, for extra richness)
– Sea salt and freshly ground black pepper
– Fresh flat-leaf parsley for garnish

The Secret Technique That Makes Vegan Italian Recipes Irresistible

Step 1: Building the Flavor Foundation

Begin by warming your plant-based stock in a medium-sized pot. This step
is crucial for all successful **vegan Italian food recipes** as it ensures even
cooking. Meanwhile, gently clean your mushrooms with a damp cloth and
slice them into generous pieces that will provide that meaty texture.

Step 2: The Traditional Soffritto (Vegan Style)

In a large skillet or heavy-bottomed pot, heat the olive oil over medium
heat. Add the finely chopped onion and let it become translucent for 3-4
minutes. The garlic then joins this aromatic base for an additional minute,
creating the foundation that makes vegan Italian recipes so flavorful.

Step 3: The Mushroom Magic

Increase the heat and add your mushrooms. Let them sear without stirring
for 2-3 minutes so they develop that irresistible golden color and
concentrated umami flavor. Season with salt and pepper, then gently mix.
This technique is essential in **vegan Italian food recipes** to build depth of
flavor.

Step 4: The Rice Ritual

Add the Arborio rice and stir vigorously for 2 minutes until the grains
become pearly. This step, called “tostatura,” seals the rice and gives it its
characteristic creamy texture that makes vegan versions of classic Italian
dishes so satisfying.

Step 5: The Wine Dance

Pour in the white wine and let it evaporate completely while stirring
constantly. This step eliminates the alcohol while preserving the subtle
aromas that elevate the best **vegan Italian recipes** to restaurant quality.

Step 6: Patience Creates Perfection

Add one ladle of hot broth and stir gently. Continue adding the broth one
ladle at a time, waiting until the liquid is almost absorbed before adding
the next. This traditional technique requires 18-20 minutes of patience, but
it’s what separates exceptional **vegan Italian food recipes** from ordinary
ones.

The Perfect Plant-Based Finish

When the rice is creamy but still slightly firm to the bite, remove the pot
from heat. Add the vegan butter, nutritional yeast, and cashew cream (if
using) while stirring vigorously. This vegan “mantecatura” creates that
velvety texture that proves plant-based cooking can rival any traditional
recipe.

Presentation Worthy of a Master Chef

Serve immediately on warmed plates. Generously sprinkle with freshly
chopped parsley and a bit of extra nutritional yeast. A drizzle of quality olive
oil as a finishing touch brings that perfect final note that makes this one of
the most impressive vegan Italian recipes you’ll ever serve.

Pro Tips for Perfect Vegan Italian Food Recipes

– Keep the broth hot: This is crucial for any risotto, vegan or traditional
– Nutritional yeast is non-negotiable: This ingredient delivers the crucial
savory richness your dish needs.

tomato-and-basil-bruschetta

The Best Quick Italian Recipe

Why Choose This Tomato and Basil Bruschetta Recipe?

This Italian bruschetta recipe is perfect for several compelling reasons. 

First, its stunning simplicity: with just 6 basic ingredients, you’ll achieve results worthy of the finest Italian trattorias.

Second, its quick execution makes it the ideal ally for impromptu appetizers or last-minute dinners.

What makes this recipe stand out?
– Accessibility: Easy-to-find ingredients available year-round
– Versatility: Perfect as an appetizer, starter, or light snack
– Authenticity: Respects traditional Italian culinary heritage
– Freshness highlights the natural flavors of vegetables
– Budget-friendly: Maximum flavor for minimal cost

Practical Information

**🕐 Prep time**: 10 minutes
**🔥 Cook time**: 5 minutes
**👨‍🍳 Difficulty**: ⭐ Very easy (beginner)
**👥 Servings**: 4 people
**💰 Budget**: Economical
**🌱 Diet**: Vegetarian (vegan without mozzarella)

Ingredients for Perfect Bruschetta (4 servings)

For the toasted bread:

– 8 thick slices of Italian bread (ciabatta or country bread)
– 3 tablespoons extra virgin olive oil
– 2 fresh garlic cloves

For the tomato-basil topping:

– 6 medium ripe tomatoes
– 15 fresh basil leaves
– 3 tablespoons premium olive oil
– 1 tablespoon balsamic vinegar
– Sea salt and freshly ground black pepper
– 100g fresh mozzarella (optional)


Step-by-Step Bruschetta Preparation

Step 1: Prepare the Bread Base

1. Preheat your oven to 400°F or prepare a toaster
2. Brush each bread slice with olive oil
3. Cook both sides for 3-4 minutes until reaching a lovely golden hue
4. While the bread is still hot, lightly massage each piece with the garlic clove

Step 2: Create the Tomato-Basil Mixture

1. Wash and dice tomatoes into uniform small pieces
2. Allow the excess liquid to strain away for 5 minutes using a fine mesh sieve
3. Finely chop fresh basil
4. Combine the diced tomatoes with chopped basil, olive oil, and balsamic vinegar
5. Season with salt and pepper to taste

Step 3: Final Assembly

1. Generously spread the tomato-basil mixture on each slice
2. Add mozzarella pieces if desired
3. Complete the dish with an elegant stream of olive oil and fresh basil garnish

Expert Tips for Perfect Bruschetta

**Tomato selection**: Choose ripe, fragrant tomatoes for optimal flavor.

**Authentic bread**: Select genuine Italian loaves featuring a crunchy exterior and light, porous interior.

**Perfect timing**: Present the dish right after preparation to preserve the bread’s delightful crunch.

**Quality olive oil**: Choose premium extra virgin olive oil produced through initial cold extraction.

Creative Variations of this Classic Recipe

Gourmet Bruschetta

Add Prosciutto di Parma and grated Parmesan for a more refined version.

Vegan Version

Replace mozzarella with mashed avocado and toasted pine nuts.

Sicilian Bruschetta

Incorporate black olives, capers, and a touch of dried oregano.

Nutritional Information

This bruschetta recipe offers excellent nutritional balance:
– Rich in lycopene from fresh tomatoes
– Source of natural antioxidants from basil
– Healthy fats from olive oil
– Complex carbohydrates from artisanal bread

Storage and Serving

**Prep time**: 10 minutes
**Cook time**: 5 minutes
**Difficulty**: Easy
**Service**: Immediate for optimal results

Bruschetta is ideally enjoyed as an antipasto, during cocktail hour with friends, or as a light starter. Pair it with a dry Italian white wine
like Pinot Grigio or Vermentino.

Conclusion

This tomato and basil bruschetta recipe embodies the simplicity and authenticity of Italian gastronomy. By following these simple steps,
you’ll create a flavorful dish that will impress your guests while respecting Italian culinary traditions. Buon appetito!

French Recipes

French  vegetarian recipes

A pleasant exploration of plant-based cuisine that honors traditional cooking
methods and seasonal, fresh ingredients may be found in French vegetarian
dishes. French food elevates everyday produce into remarkable dishes
without the need of meat, from robust vegetable soups and sophisticated
gratins to colorful salads and rustic tarts. These simple vegetarian dishes,
which include creamy mushroom risotto, French onion soup with cheese, and
ratatouille, highlight traditional French flavors. With ingredients like fresh
vegetables, artisanal cheeses, herbs of Provence, and premium olive oil, many
classic French recipes are inherently vegetarian. French vegetarian cooking
offers countless inspiration for anything from spectacular meals for
entertaining to healthy dinner ideas for hectic weeknights. These recipes are
suitable for home cooks of all skill levels due to their emphasis on seasonal
cooking and straight forward preparation techniques. Learn how French
culinary traditions may enhance your plant-based cuisine by highlighting the
inherent beauty of grains, legumes, and vegetables while maximizing flavor.

Easy 25-Minute Ratatouille Recipe: Quick French Vegetarian Dinner

The best easy ratatouille recipe for busy weeknights – one pot, fresh vegetables, authentic French flavors

Why This Easy Ratatouille Recipe Works

This quick French vegetarian dinner transforms the classic Provençal dish into a weeknight-friendly meal without sacrificing authentic flavors.

Perfect for busy home cooks:
– ✅ One-pot cooking – minimal cleanup
– ✅25 minutes total – faster than delivery
– ✅ Beginner-friendly – simple techniques
– ✅ Mediterranean diet approved – fresh summer vegetables
– ✅Budget-friendly – affordable ingredients

Easy Ratatouille Ingredients (Serves 4)

Fresh Vegetables

– 1 medium eggplant
– 2 zucchini
– 1 red bell pepper
– 1 yellow bell pepper
– 3 ripe tomatoes
– 1 large onion

Flavor Enhancers
– 3 garlic cloves – minced fresh
– 4 tbsp high-quality olive oil
– 1 tsp French herb blend – traditional Provençal seasoning
– Fresh basil leaves  – for finishing and fragrance
–  Sea salt and black pepper  – season according to taste

 How to Make Easy Ratatouille in 25 Minutes

 Step 1: Prep Vegetables (8 minutes)


1.  Dice all vegetables  into uniform 1-inch cubes
2.  Thinly slice onion  for faster cooking
3.  Mince garlic fresh  for optimal flavor
4.  Quarter tomatoes  and remove excess seeds

Step 2: One-Pot Cooking (15 minutes)

1. Warm olive oil in a large pan over medium-high heat
2.Cook diced onion for 2 minutes until soft and transparent
3.Add garlic – sauté 30 seconds until fragrant
4. Include eggplant and bell peppers – cook 5 minutes, stirring often
5. Add zucchini and tomatoes as vegetables release natural juices
6. Add herbs liberally along with salt and pepper for depth
7. Place lid on pan and cook gently for 8 minutes until vegetables are soft yet retain structure

Step 3: Final Touch (2 minutes)


– Adjust seasoning to taste
– Fold in fresh basil for brightness
– Rest briefly to allow flavors to blend

Serving Suggestions

Main Dish Options


– Over grains like quinoa or brown rice
– With artisan bread for sauce absorption
– Topped with soft cheese for richness

Side Dish Pairings


-*Alongside poultry or seafood – traditional Mediterranean combination
– With pasta dishes – simple and satisfying
– Complementing egg dishes – excellent for brunch

Expert Tips & Variations

Cooking Success


– Avoid overcrowding – prevents proper browning
– Maintain medium heat – preserves texture while preventing burning
– Cut uniformly – ensures even 25-minute cooking

Healthy Additions

– Incorporate legumes – boosts protein and dietary fiber content
– Include root vegetables – try adding mushrooms, carrots, or sweet potatoes alongside traditional ingredients
– Add nutritional yeast – delivers rich, cheese-like taste while remaining plant-based

Storage & Meal Prep

– Refrigerate 4 days – the dish improves as ingredients meld overnight
– Freeze 3 months – ideal for batch preparation
– Scale up easily – use larger cookware and extend cooking by 5 minutes

Nutritional Benefits

This healthy Mediterranean recipe provides:
– High fiber content – supports digestive wellness
– Antioxidant-rich – from vibrant vegetables
– Modest calorie count – roughly 120 calories per portion
– Heart-healthy oils from quality olive oil
– Clean ingredients – no processed additives

Quick FAQ

Can I prepare ahead? Yes! The flavor profile actually improves after resting overnight.

What substitutions work? Root vegetables and mushrooms complement the traditional base beautifully.

Is this authentically French? This version maintains classic flavors while adapting to modern time constraints.

Ready in: 25 minutes 

Difficulty: Beginner

Cost: Budget-friendly

Diet: Vegetarian, Mediterranean, Gluten-free

Perfect quick French vegetarian dinner for busy weeknights!


Indian Recipes


Easy Indian Vegetarian Recipes: Authentic Curry and Dal Dishes for Home Cooking

Explore delicious Indian vegetarian recipes that bring authentic flavors straight to your kitchen. This comprehensive guide features easy vegetarian curry recipes, traditional dal dishes, and healthy Indian meals perfect for everyday cooking. From simple vegetable curry preparations to classic paneer recipes, each dish celebrates the rich tradition of Indian vegetarian cooking.

Home page

Power Bowl: Vegan Chickpea, Kale & Quinoa

If you’re looking for a healthy meal that is easy to make, full of nutrients, and truly satisfying, a Buddha bowl is a perfect choice. This vibrant vegan bowl with chickpeas and kale is a celebration of simple plant-based ingredients. It combines protein-rich chickpeas, nutrient-packed kale, and a variety of fresh colorful veggies, all brought together by a rich and creamy lemon tahini dressing. Perfect for a quick dinner, a healthy lunch, or meal prep, this bowl shows how delicious and fulfilling healthy eating can be.

The beauty of this dish lies in its harmony of textures and flavors. You get the satisfying crunch of roasted chickpeas and fresh vegetables, the soft, fluffy base of quinoa, the creaminess of ripe avocado, and the bright, tangy punch of the dressing. Each component plays a crucial role, creating a balanced meal that will keep you energized and satisfied for hours.

Why You’ll Love This Recipe

This isn’t just another salad; it’s a meticulously balanced plate designed for optimal health and taste. Here’s what makes it special:

  • Complete Nutrition: It delivers a perfect combination of complex carbohydrates (quinoa), plant-based protein (chickpeas), healthy fats (avocado, tahini, olive oil), and a wide spectrum of vitamins and minerals from its colorful array of vegetables.

  • Meal Prep Champion: The individual components store beautifully for 3-4 days, making it incredibly easy to assemble a healthy lunch in minutes throughout the week.

  • Endlessly Customizable: This recipe is a fantastic template. Use it as a guide and swap in your favorite grains, veggies, or proteins based on what’s in season or what you have in your refrigerator.

  • Naturally Vegan and Gluten-Free: It caters to a wide range of dietary preferences without any compromise on flavor or satisfaction.

Gathering Your Ingredients (Serves 2-3)

This recipe is built on whole, accessible ingredients. For the best flavor and texture, try to use fresh, crisp vegetables.

For the Bowl:

  • 1 tin (425g) of chickpeas, drained and rinsed thoroughly

  • 4 cups of fresh kale, stems removed and leaves finely chopped

  • 1 cup quinoa, uncooked (rinsed well)

  • 1 large carrot, julienned or coarsely grated

  • 1 cucumber, diced

  • 1 red bell pepper, thinly sliced

  • 1 avocado, sliced just before serving

  • 1/4 red cabbage, thinly sliced for a vibrant crunch

  • 2 tablespoons pumpkin seeds or sunflower seeds, for garnish

  • Fresh herbs like cilantro or parsley, chopped, for a fresh finish

For the Lemon Tahini Dressing:

  • 3 tablespoons tahini (well-stirred)

  • Juice of 2 lemons (about 1/4 cup)

  • 2 tablespoons extra virgin olive oil

  • 1 clove garlic, finely minced

  • 1 teaspoon maple syrup (or agave nectar)

  • 1/2 teaspoon ground cumin

  • Salt and freshly ground black pepper, to taste

  • 2-3 tablespoons water, to thin the dressing to a pourable consistency

For the Roasted Chickpeas:

  • 1 tablespoon olive oil

  • 1/2 teaspoon paprika (smoked paprika adds a wonderful depth)

  • 1/2 teaspoon ground cumin

  • 1/4 teaspoon garlic powder

  • Salt and pepper to taste

Crafting Your Bowl: A Step-by-Step Guide

The process of building this bowl is simple, but a few key techniques ensure the best possible result.

Step 1: Prepare the Quinoa Base

Thoroughly rinse the quinoa under cool water in a fine-mesh strainer until the water runs clear. This crucial step removes its natural bitter coating, called saponin. In a medium saucepan, combine the rinsed quinoa with 2 cups of water. Bring to a boil, then immediately reduce the heat to low, cover, and simmer gently for about 15 minutes. Remove from heat and let it stand, still covered, for 5 minutes. Finally, fluff it gently with a fork. This resting period allows the grains to separate perfectly, creating a light and fluffy base for your bowl.

Step 2: Create the Crispy Roasted Chickpeas

Preheat your oven to 400°F (200°C). After rinsing, pat the chickpeas completely dry with a clean kitchen towel or paper towels—this is the secret to achieving maximum crispiness. In a bowl, toss the dried chickpeas with olive oil, paprika, cumin, garlic powder, salt, and pepper until evenly coated. Spread them in a single layer on a parchment-lined baking sheet. Roast for 20-25 minutes, shaking the pan halfway through, until they are golden brown and deliciously crispy.

Step 3: Massage the Kale

Place the chopped kale in a large bowl. Add a tiny drizzle of olive oil and a pinch of salt. Using your hands, massage the kale for 1-2 minutes. You will feel the leaves begin to soften and darken in color. This simple process breaks down the tough, fibrous cellulose structure, making the kale tender, sweeter, and much more enjoyable to eat raw.

Step 4: Whisk Together the Dressing

In a small bowl or jar, combine the tahini, fresh lemon juice, olive oil, minced garlic, maple syrup, and cumin. Whisk vigorously. The mixture may seize up and thicken initially—this is normal. Slowly add water, one tablespoon at a time, whisking continuously until the dressing becomes smooth, creamy, and reaches your desired pourable consistency. Season generously with salt and pepper.

Step 5: Assemble Your Masterpiece

Now for the fun part: assembly! Divide the fluffy quinoa between 2-3 bowls. Artfully arrange your prepared ingredients in sections around the bowl: the massaged kale, crispy roasted chickpeas, julienned carrot, diced cucumber, sliced bell pepper, and vibrant red cabbage. Top the bowl with fresh avocado slices, a sprinkle of pumpkin seeds, and a generous drizzle of the creamy lemon tahini dressing. Finish with a garnish of fresh herbs.

Serving Suggestions and Expert Tips

– Serve Immediately: For the best textural experience, assemble and       serve the bowl immediately while the roasted chickpeas are still warm and crispy.
– Meal Prep Like a Pro: Store all components separately in airtight containers in the refrigerator. The dressing can be stored in a jar for up to 5 days. Assemble your bowls just before eating to maintain perfect texture.
– Customize Your Creation: This recipe is a canvas. Feel free to add other roasted vegetables like sweet potato cubes or beetroot, or toss in cherry tomatoes for a burst of sweetness.
– Dressing Variations: If you don’t have tahini, a simple vinaigrette with lemon juice, olive oil, dijon mustard, and a touch of maple syrup makes a fantastic alternative.

A Deep Dive into the Nutritional Benefits

This Buddha bowl is a nutritional powerhouse designed to fuel your body and mind. The quinoa and chickpeas provide a complete protein profile, containing all nine essential amino acids. The avocado and tahini contribute heart-healthy monounsaturated fats, which are crucial for nutrient absorption and hormone health. The kale is a superstar, loaded with iron, calcium, and vitamins A, C, and K. The red cabbage and bell peppers are bursting with antioxidants and vitamin C. Speaking of vitamin C, the lemon-based dressing is not just for flavor; it significantly enhances the body’s ability to absorb the non-heme iron present in the kale and chickpeas, making this bowl a perfect example of synergistic nutrition.

Prep Time: 20 minutes

Cook Time: 25 minutes 

 Total Time: 45 minutes

 Serves: 2-3

Home page

Moroccan Recipes

Traditional Moroccan Recipes

Authentic Flavors from Morocco

Discover the rich culinary heritage of Morocco with our collection of traditional Moroccan recipes that bring authentic North African
flavors to your kitchen. From fragrant Moroccan spices to time-honored cooking techniques, explore the diverse world of Moroccan cuisine
with easy-to-follow recipes perfect for home cooks.
Our authentic Moroccan dishes feature beloved classics like fluffy Moroccan couscous, aromatic Moroccan tagine recipes, and sweet Moroccan
desserts that showcase the country’s unique blend of Berber, Arab, and Mediterranean influences. Whether you’re craving savory Moroccan
chicken recipes, hearty Moroccan vegetarian dishes, or want to master the art of Moroccan bread making, you’ll find step-by-step guides
with ingredient lists and cooking tips.
Learn to cook with traditional Moroccan cooking methods using common pantry ingredients and discover how Moroccan food culture celebrates
family, hospitality, and the joy of sharing meals. Each recipe includes background stories, cultural context, and variations to help you
create memorable Moroccan meals that transport you straight to the bustling souks and family kitchens of Morocco.
Perfect for beginners and experienced cooks alike, these easy Moroccan recipes use accessible ingredients while maintaining the authentic
taste that makes Moroccan food so beloved worldwide.

Moroccan Salad Mechouia

Moroccan Machouia Salad: Authentic Grilled Vegetable Recipe

Prep

Time: 20 minutes | Cook Time: 25 minutes | Serves: 4 people

Moroccan machouia salad is one of the most iconic traditional dishes from North African cuisine.
This tasty grilled vegetable combination features flame-roasted bell peppers, tomatoes, and eggplant, elevated with
fragrant North African seasonings. Ideal as a small plate starter or accompaniment, this traditional Moroccan dish delivers
the vibrant flavors of Morocco to your table.

Ingredients for Moroccan Machouia

Fresh Vegetables:

– 4 ripe  tomatoes
– 2 medium  green bell peppers 
– 2 medium  red bell peppers 
– 1 medium eggplant 
– 4  garlic cloves 

Traditional Moroccan Seasoning:

– 3 tablespoons of extra virgin olive oil 
– 1 teaspoon ground cumin 
– 1 teaspoon  sweet paprika 
– 1/2 teaspoon  red pepper flakes  (optional)
–  Sea salt and   black pepper  to taste
– Juice of 1/2  fresh lemon 
– 2 tablespoons chopped  fresh parsley 
– 1 tablespoon chopped  fresh cilantro 

How to Make Machouia Salad

Step 1: Roast the Vegetables (25 minutes)
1. Heat your oven to 425°F (220°C) or set up a barbecue grill.
2. Arrange whole tomatoes, bell peppers, and eggplant on a roasting pan.
3. Roast vegetables for 20-25 minutes until skins are charred and blistered.
4. Turn vegetables halfway through for even cooking.

Step 2: Peel and Dice (15 minutes)
1. Allow  roasted vegetables  to cool in a plastic bag for easier peeling
2. Carefully remove charred skins from tomatoes, peppers, and eggplant
3. Remove seeds from peppers and discard any burnt portions
4. Dice vegetables  into small, uniform pieces

Step 3: Season and Mix (10 minutes)
1. Finely mince **garlic** and combine with diced vegetables
2. Add  olive oil, cumin, and paprika. 
3. Stir in  lemon juice  and  fresh herbs. 
4. Season with salt and pepper, and mix gently to combine

Cooking Tips for Perfect Machouia

Alternative Cooking Methods:

–  Gas flame grilling: Char vegetables directly over open flame using tongs
–  Outdoor barbecue: Grill on medium-high heat for authentic smoky flavour.
–  Broiler method: Use oven broiler for quick charring

 Pro Chef Secrets :

– Select fully ripe vegetables for maximum flavor.
– Don’t add salt until final step to prevent vegetables from releasing excess water
– Allow salad to sit 30 minutes before serving to let flavors blend harmoniously

 Regional Variations

Fez Style:

Add black olives and fresh mint leaves

Marrakech Version:

Include cherry tomatoes and a touch of “harissa” paste. 

Modern Twist:

Top with roasted pine nuts and crumbled fresh goat cheese. 

Serving Suggestions

This Moroccan grilled salad pairs beautifully with:
– Moroccan bread (khubz) or pita bread
– Tagine  dishes and  couscous 
–  Mediterranean mezze platters
–  Grilled meats  or  vegetarian main courses 
–  Quinoa bowls  for a healthy meal

Nutritional Benefits

Machouia salad is packed with:
–  Vitamin C  from bell peppers and tomatoes
– Antioxidants, including lycopene from roasted tomatoes
–  Dietary fibre from eggplant and vegetables
–  Heart-healthy  monounsaturated fats from olive oil
–  Anti-inflammatory  compounds from cumin and garlic

Storage and Make-Ahead Tips

– Refrigerate: Store covered for up to 4 days
– Freezing: Not recommended due to texture changes
–  Serving temperature: Best enjoyed at room temperature
– Make-ahead: Flavors improve overnight in the refrigerator

Exit mobile version